
A DIY whole-house water filter can work well if the design matches your water test, your household flow rate, and the problem you are trying to solve. The biggest mistakes are usually poor cartridge selection, undersized housings, and skipping service features like bypass valves and pressure gauges.
For basic whole-house filtration, a DIY build can make sense when the main goals are sediment reduction, chlorine reduction, and broad water cleanup. It is a much riskier project when the real problem is iron, sulfur, bacteria, or another issue that needs specialty treatment.
If you are comfortable with basic plumbing and willing to test before and after install, building your own system can save money and give you more control. If not, a ready-made system is usually the safer route.
🧠 Quick Takeaways
- DIY whole-house filters can save money, but only if the design matches your water quality and flow-rate needs.
- Start with a real water test. Do not choose cartridges first and hope they fit the problem later.
- A simple setup can work well for sediment, chlorine, and broad water cleanup, but not every DIY build is a fit for iron, sulfur, bacteria, or PFAS.
- Bypass valves, shut-off valves, and pressure gauges are not optional “extras” on a good DIY build. They make servicing and troubleshooting much easier.
- If you build your own system, plan to test after install too. Otherwise, you are still guessing.
⚖️ DIY Whole-House Filters: Pros and Cons

A DIY whole-house system can be a smart project, but only if you go into it with clear expectations.
| ✅ Pros | ⚠️ Cons |
|---|---|
| Customizable to your water test and treatment goals | You are responsible for design mistakes and part selection |
| Can cost less than a premium prebuilt system | Installation takes time and basic plumbing confidence |
| Easy to expand or reconfigure later | No system-level warranty if performance falls short |
| Uses common housings and cartridges if you build smart | Pressure loss and poor sizing can cause real headaches |
| Good learning project if you want control over maintenance | You still need post-install testing to know whether it actually worked |
💡 Helpful Note: The biggest DIY mistake is trying to build the “most powerful” system instead of the right one. A simpler setup that matches your water can outperform a bloated setup built around guesswork.
🛠️ Ready to Build? Start Here
The cleanest way to approach a DIY build is to think in this order: test first, choose the treatment stages, size the hardware, then install.
If you want a few ideas for how different multi-stage systems are put together, check out these whole-house filter examples. Use them as a reference point, not as a shopping shortcut.
🧪 Step 1: Test Your Water First
Before you buy a single housing or cartridge, figure out what is actually in your water.
Different contaminants need different treatment methods. A sediment-and-carbon build may work well for chlorine and debris, but it will not automatically solve hardness, iron, sulfur, bacteria, PFAS, or other specialty problems.
- City water: Start with your Consumer Confidence Report, then use a lab test if you want a clearer picture of what is happening at the tap inside the home.
- Well water: Testing is fully your responsibility. Well-water builds usually need more careful planning because the problems can be very different.
- Best practice: Use lab testing if the budget allows. It is much easier to build the right system once than rebuild the wrong one later.
(Need help? Here’s an easy guide on how to test your water supply.)
💬 Good to Know: Testing first can save you from overspending just as much as it can save you from underbuilding. Plenty of DIY systems are more complicated than they need to be.
🛠️ Step 2: Choose the Right Components
This is where the system is really designed. You are not just picking parts. You are deciding what gets treated, in what order, and at what flow rate.
| Component | Why It Matters |
|---|---|
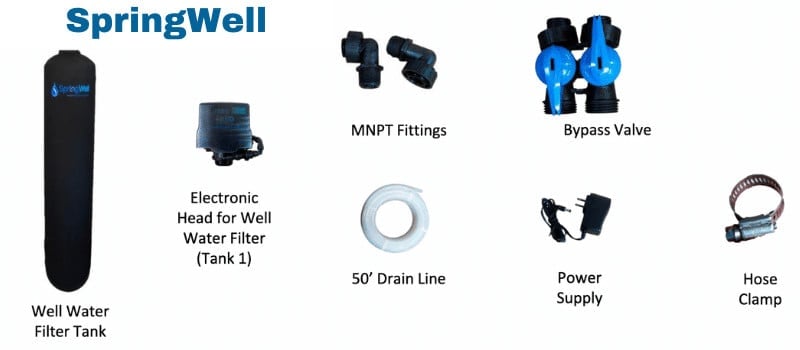
| Filter Housings | Determine cartridge size, flow capacity, and service intervals. Bigger housings usually mean better flow and longer cartridge life. |
| Sediment Cartridges | Catch rust, dirt, sand, and debris before they clog the rest of the system. |
| Carbon Cartridges or Media | Used for chlorine, odor, taste, and broad chemical cleanup, depending on the media type. |
| Specialty Cartridges | Needed when the water test points to a specific problem like lead, fluoride, PFAS, or another targeted contaminant. |
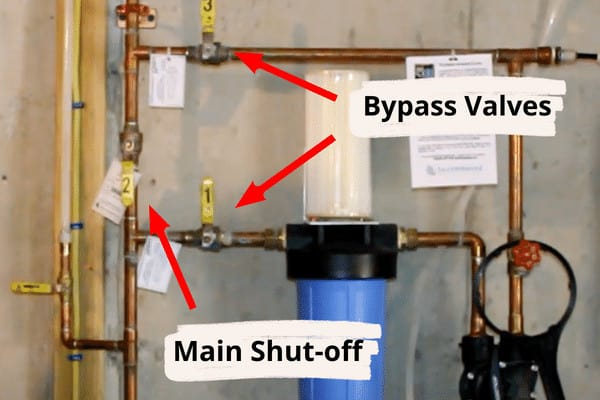
| Bypass & Shut-Off Valves | Make service possible without shutting down the whole house every time. |
| Pressure Gauges | Help you spot pressure drop and clogged cartridges before performance gets bad. |
| Mounting Hardware | Keeps the system stable and secure once the housings are full of water. |
| Drain Lines (if needed) | Necessary for systems that backwash or discharge water during operation. |
💬 Pro Tip: Use common housing sizes whenever possible. Standard 10-inch or 20-inch Big Blue-style housings are much easier to live with long term than proprietary formats.
🧠 Smart Tip: Pay attention to flow rate as much as filter media. A DIY build that looks great on paper can still feel terrible in the house if you undersize it.
For cartridge performance claims, look for systems or components that are NSF certified when possible. That is one of the easiest ways to separate real performance claims from loose marketing language.
🧰 Step 3: Gather Your Materials
Once you know the treatment order and hardware size, gather everything before you start cutting pipe.
✅ Plumbing materials:
- Filter housings
- Cartridges or media
- Pipe fittings and elbows matched to your plumbing type
- Bypass and shut-off valves
- Pressure gauges
- Teflon tape or thread sealant, where appropriate
- Mounting brackets
- Drain tubing, if the system needs it
✅ Tools checklist:
- Pipe cutter or hacksaw
- Adjustable wrench
- Drill and bits
- Screwdriver
- Sandpaper or deburring tool
- Silicone grease for O-rings
- Flashlight
- Bucket and rags
💬 Pro Tip: Lay every part out in installation order before shutting the water off. That one step catches a lot of avoidable mistakes.
🛠️ Smart Tip: Do not cheap out on fittings, valves, or O-rings. Small parts are usually where leaks and frustration start.
🛠️ Step 4: Assemble and Install the System

Once the plan is right, installation is mostly about working in the right order and not rushing.
✅ Basic install sequence:
- Turn off the main water supply. Start safe. Make sure pressure is relieved before cutting into the line.
- Cut into the main line. Create the space needed for the housing assembly, valves, and any gauges.
- Prep the pipe ends. Clean and smooth the cuts so you are not fighting leaks later.
- Install shut-off and bypass valves. This makes future cartridge changes much easier.
- Mount the housings securely. Water-filled housings are heavy, so this part matters more than people think.
- Connect the filter stages in the correct order. A common sequence is sediment first, carbon second, then any specialty stage after that.
- Prime and flush the filters. Follow the cartridge or media instructions before normal use.
- Restore water slowly and inspect for leaks. Go connection by connection.
- Check pressure and flow. The job is not done just because water is moving.
💬 Good to Know: If you are adding UV or a backwashing filter, placement matters. Specialty stages should be installed in the right order for the type of treatment you are using.
🛠️ Pro Tip: If you are not comfortable cutting into the main line, there is nothing wrong with designing the system yourself and hiring out that part of the install.
🔍 Step 5: Test, Tune, and Recheck
Once the system is installed, do not assume the job is finished. This is the point where a lot of DIY builds either prove themselves or start showing weak spots.
✅ Final checklist:
- Restore water slowly. Sudden pressure shocks are a bad way to introduce a brand-new system.
- Check every fitting and housing. Tiny leaks now become bigger problems later.
- Cycle the bypass if installed. Make sure the valve layout works the way you planned it.
- Watch pressure and flow. If pressure tanks after install, the build may be too restrictive for the house.
- Flush new carbon thoroughly. Carbon dust and fines are normal at first.
- Test the treated water. This is the only way to know whether the system is doing the job you built it to do.
💬 Good to Know: New carbon cartridges often release harmless black dust at first. A proper flush usually clears it up quickly.
🛠️ Pro Tip: Write down the installation date of each cartridge and set reminders for replacement intervals. A DIY system is only as good as its upkeep.
📌 Final Thoughts
Building your own whole-house water filter can absolutely work, but it is not just a matter of screwing a few housings together and hoping for the best. The project works when the design matches the water, the hardware matches the house, and the final result is verified after install.
If you want full control, standard cartridge flexibility, and the chance to save money, DIY can be a smart route. If you want a cleaner install path with less trial and error, a ready-made system may be the better fit.
- Start with a water test.
- Choose treatment stages based on the actual problem.
- Size the system for flow, not just contaminant removal.
- Install it cleanly and test it after.
If you do those four things well, a DIY build can be a practical and effective whole-house filtration setup.
 153 people found this helpful. Was this guide helpful to you?