
Installing a whole-house water filter might seem intimidating—especially if you’ve never cut into plumbing before. What if you pick the wrong spot? What if something leaks?
Relax. You don’t need to be a master plumber to do this right. With a few basic tools and a little patience, most homeowners can handle the job start to finish. This guide walks you through everything—step by step—with a few pro tips tossed in to make life easier.
Let’s get into it.
🧠 Quick Takeaways
- 🛠️ You’ll need basic tools like a pipe cutter, wrench, and Teflon tape
- 🚰 Filters go before your water heater to treat both hot and cold water
- 🧊 Avoid outdoor installs in freezing climates—keep it warm and accessible
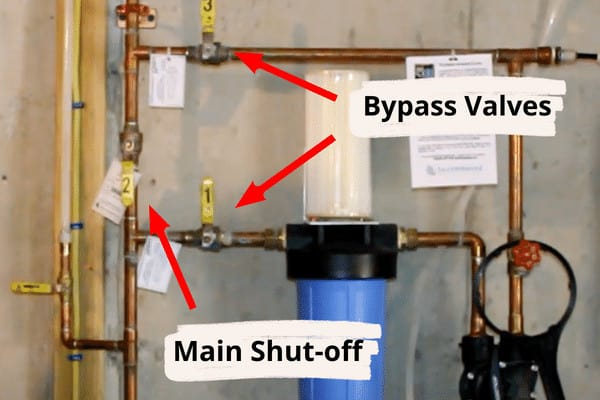
- 🔁 Adding shut-off or bypass valves makes future maintenance way easier
- 💧 Always test your water before and after install to confirm it’s working right
- 💸 Pro installation can cost more, but it’s faster and code-compliant see why
💡Installing Your New System

🧰 Before You Start
Installing a whole-house filter doesn’t require fancy tools or years of plumbing experience—but you do want to prep properly before cutting into your main line. That means gathering tools, picking a good install spot, and knowing how to shut things down safely.
🧰 Tools, Safety, & Location Prep
| 🔧 What You’ll Need | 🧠 Safety First | 📍 Best Location Tips |
|---|---|---|
| Adjustable wrench | Shut off the main water supply | Near where your main line enters the home |
| Pipe cutter or hacksaw | Wear gloves and safety goggles | Accessible for filter changes |
| Teflon tape | Keep a bucket handy for leftover water | Indoors or in an insulated space if it freezes |
| Screwdriver | Turn off electric water pump (if on a well) | Avoid tight spots that are hard to reach |
| Mounting hardware (if included) | Mount it before your water heater |
💡 Pro Tip:
If your system doesn’t include a bypass valve, this is the perfect time to add one. It lets you divert water around the filter when needed—ideal for outdoor tasks, filter changes, or troubleshooting without shutting down the whole house.
🪛 Step-by-Step Instructions

Installing a whole-house filter is a lot easier when you break it into small wins. You’re mostly just cutting into your main water line, inserting the filter, and sealing things up tight. Here’s how to get it done without calling a plumber.
| 🔢 Step | 💬 What to Do | 🛠️ Pro Tip |
|---|---|---|
| 1. Turn Off Water | Shut off the main valve before doing anything else. | Open a faucet to release leftover pressure in the line. |
| 2. Pick Your Spot | Choose a place near where your water enters the house. | Make sure there’s enough room to swap filters later. |
| 3. Cut the Pipe | Measure and remove a section of pipe where the filter will go. | Use a pipe cutter for cleaner edges (less leaking). |
| 4. Add Shut-Off or Bypass Valves | Optional but super handy for maintenance or outdoor use. | Install now while everything’s exposed—much easier. |
| 5. Attach Fittings | Wrap Teflon tape on threads and install the inlet/outlet connectors. | Tighten gently—overdoing it can crack plastic threads. |
| 6. Mount the Filter | Use brackets (if included) to attach it securely to a wall or board. | Keep the unit upright and level to avoid stress on fittings. |
| 7. Insert Filter Cartridge | Open the housing, drop in the correct cartridge(s), and reseal. | Check the O-ring is seated properly before tightening. |
| 8. Turn Water Back On | Slowly open the valve and let water flow into the system. | Watch for leaks at every joint as it pressurizes. |
💡 Wrapping Up
If everything looks dry and you hear no air hissing, congrats—you’ve officially installed your whole-house filter. Not bad for a few hours’ work, right?
Just give it a day or two of regular use, then peek at the housing and fittings again to confirm nothing’s shifted. Filters loosen under pressure sometimes, so a quick re-tighten might be needed early on.
🧼 Maintenance: Keep Your Filter Working Like New
Your whole-house filter doesn’t ask for much—but a little attention goes a long way. Staying on top of simple tasks like cartridge swaps and leak checks will keep your water flowing clean and your system running strong.
| 🔧 Task | 📅 How Often | 💡 Why It Matters |
|---|---|---|
| 🧃 Replace Filter Cartridges | Every 3–6 months (or as directed) | Clogged filters reduce flow and can let contaminants slip through. |
| 🔍 Check for Leaks | Once a month | Catch minor issues before they become water damage headaches. |
| 🚿 Monitor Water Pressure | As needed | Sudden drops might mean it’s time to change the cartridge or flush sediment. |
| 🧪 Test Water Quality | Every 6–12 months | Make sure your system is actually improving water quality as expected. |
| 👨🔧 Schedule Pro Servicing | Every 1–2 years | A licensed plumber can spot issues before they affect your home’s plumbing. |
Regular maintenance only takes a few minutes—but it could add years to your system’s lifespan. Put a reminder in your phone, stock up on filters, and you’ll never have to worry about sudden drops in water quality again.
✅ Final Thoughts
Installing a whole-home water filter might seem like a big leap—but with the right prep and a steady hand, it’s completely doable. And once it’s in, the payoff is instant: better-tasting water, cleaner laundry, and peace of mind knowing your family is protected from contaminants.
Whether you DIY the whole thing or bring in a pro for the tricky parts, the important thing is staying proactive. Check your system once in a while, change the filters when needed, and test your water to make sure it’s doing its job.
You’ve got this—and your water will thank you for it. 💧
 88 people found this helpful. Was this guide helpful to you?