
How to Change a Whole House Water Filter: 10 Steps

Mike Martin brings hands-on installation experience and helps validate the real-world setup and serviceability of the systems we cover.
✅ Quick answer: Shut off the water, release the pressure, remove the housing, clean it, inspect and lubricate the O-ring, center the new cartridge, and hand-tighten the housing. Restore water slowly, bleed out the air, check for leaks, and flush the cartridge as directed.
Most cartridge changes take 15–30 minutes. The exact valve positions, cleaning method, and flushing time vary by system, so keep the housing and cartridge instructions nearby.

🔧 What You’ll Need
- The correct replacement cartridge
- The housing wrench supplied with the system
- A bucket and towels
- Clean, food-grade silicone grease
- A replacement O-ring, if the existing one is damaged
- Cleaning supplies specified by the manufacturer
You normally don’t need thread-seal tape for a cartridge change. The sump seals against its O-ring, not the housing threads. Avoid grabbing a plastic canister with channel locks, which can deform or crack it.
🛠️ How to Change a Whole House Water Filter
- Confirm the cartridge. Match its model, dimensions, micron rating, and flow requirements to your housing before shutting anything down.
- Save some clean water. If the main supply also feeds the whole house, fill a clean container for washing the housing after the water is off.
- Isolate the filter. Close the inlet and outlet valves or place the system in bypass. If your well setup requires the pump to be switched off, follow its operating instructions.
- Release the pressure. Open a nearby cold-water faucet. Press the housing’s pressure-release button, if present, until the pressure is gone.
- Remove the housing. Put a bucket underneath, support the canister, and loosen it with the correct housing wrench. Expect the sump to contain water.
- Remove the old cartridge and clean the sump. Take out the O-ring first, then clean the canister and O-ring groove using the method in the manufacturer’s manual. Rinse thoroughly.
- Inspect the O-ring. Replace it if it is cut, stretched, flattened, or brittle. Otherwise, apply a light coat of clean silicone grease and seat it evenly in its groove.
- Center the new cartridge. Remove all packaging and place the cartridge over the standpipe or locating point in the bottom of the sump.
- Reinstall the housing. Make sure the upper standpipe enters the cartridge, then screw the sump onto the cap by hand. Don’t overtighten it.
- Restore service slowly. Open the supply gradually while venting trapped air. Check the housing seal for leaks, then flush the cartridge for the time and flow rate stated in its instructions.
Which Way Do You Turn the Filter Housing?
Check the molded arrow or the housing manual before forcing it. Viewing direction can make “left” and “right” confusing on a canister mounted overhead. Use the wrench in the manufacturer’s loosening direction while supporting the housing and bracket.
The wrench supplied with many housings is intended mainly for removal. When reinstalling the sump, hand-tighten it unless the manufacturer specifically tells you to add a light wrench snug.
What If the Filter Housing Is Stuck?
A housing under pressure can feel locked in place. Before applying more force, verify that both sides are isolated, open a faucet, and hold the pressure-release button again.
- Use the correctly sized housing wrench rather than channel locks.
- Support the cap and bracket so the plumbing doesn’t take the twisting force.
- A strap wrench may provide more even grip if the housing manufacturer permits it.
- Don’t hammer, heat, or crush a plastic sump.
- If the bracket flexes or the canister starts to deform, stop and call a plumber or service technician.
A clean, properly seated O-ring and a hand-tightened sump make the next change easier. Overtightening doesn’t improve the seal; it usually makes future removal harder.
💧 What to Check After the Filter Change
If water appears between the cap and sump, shut the supply off and release the pressure again. Remove the housing, clean the groove, inspect the O-ring, lubricate it lightly, and reseat it level. Replace a damaged seal rather than trying to compensate by overtightening the housing.
If pressure remains low, confirm that every valve is fully open and the cartridge is the correct model. A finer-than-needed cartridge can also restrict whole-house flow, especially on water carrying heavy sediment.
Continue watching the housing during the first few minutes after startup. If a leak persists, isolate the system instead of leaving it pressurized.
🧪 Why Replacement Timing Matters
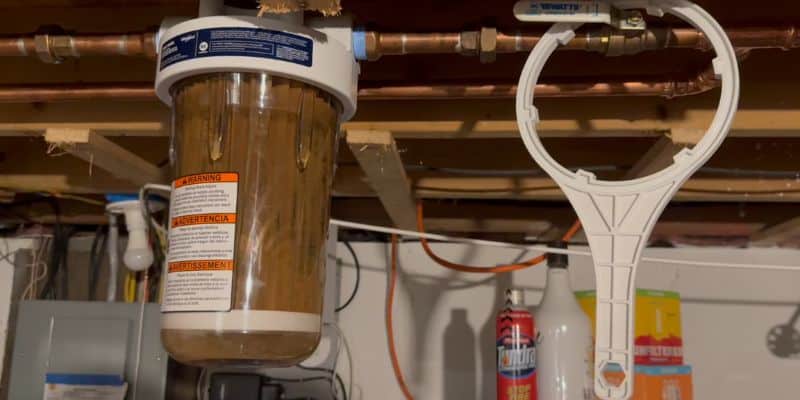
We saw what an overdue cartridge can do in a Whirlpool WHKF-DWHBB housing treating water with heavy sediment and iron. One faucet still seemed acceptable, but flow dropped sharply when the shower, washer, and kitchen faucet ran together. The cartridge had remained in service for months beyond its replacement point.
That kind of restriction can hide during light demand. Check the filter under normal peak use, not only at one sink.
How Often Should You Change It?
Use the cartridge manufacturer’s capacity or replacement interval as the starting point. Change it sooner when sustained pressure loss, visible loading, or a return of the problem it was designed to treat appears.
Well-water cartridges may load faster when sediment changes seasonally or after work on the well. Our guide to removing sediment from well water explains when a coarse first stage can protect finer cartridges. If you’re unsure which replacement size to use, see the water-filter micron rating guide.
The replacement procedure is similar for city and well water, but the cartridge and service interval should match the actual water conditions. When contamination is a concern, test the water instead of judging filter performance by appearance alone.
Procedure cross-checked against manufacturer cartridge-replacement guidance from Pentair OMNIFILTER. Always follow the manual for your specific housing and cartridge.